
How to make Low Tunnels

Here is our first winter with low tunnels on our old rental plot of land. As you can see the weight of the snow collapsed some of the tunnels, and to the far left you’ll notice where the wind ripped off the plastic. Year after year we learned from these mistakes!
As we get into the summer months, winter is the last thing we want to think about, however as a farmer we always need to be planning for the next season ahead. Here in South NJ we are zone 7 which means we do get freezing temperatures, but we are mild enough to overwinter a lot of crops without heated spaces. When I first started growing flowers, it was impossible to harvest bucket loads of blooms for Mother’s Day - my busiest Holiday! I had to turn down multiple customers because I didn’t have enough flowers to harvest. May is a tricky month for farmers because your early bulb crops like Tulips and Daffodils are done blooming, and you are just starting to plant your heat loving summer annuals. This is where low tunnels come into play!


If you are a small farmer like me, or a large farm looking for a simple way to overwinter crops, then low tunnels are a great choice! Since my new property is mostly wooded, we have limited space for a 100' high tunnel but can fit multiple 40-foot-long low tunnels. We have used both 100’ long low tunnels as well as smaller 40-50’ low tunnels. You’ll see photos of both throughout this blog post. Personally, we prefer smaller rows therefore smaller low tunnels. Smaller tunnels are easier to manage and less prone to weather damage. These are generally cheap, easy to install, and long lasting throughout the years and weather. We hope that this simple blog post can help give a broad overview on the best materials to use and mistakes we've learned throughout the years.


MATERIALS YOU’LL NEED:
(Not sponsored)
EMT Conduit (1/4 to 1/2 inch). You will need 9 foot sections. We got our conduit from Home Depot.
Hoop bender (unless you can score some pre-bent hoops from another farmer). We sourced our hoop bender from Johnny's Seeds.
Rebar (do not use flimsy fiberglass rods).
5 mil plastic film or whatever you have on hand. We get recycled plastic from our places of employment (perks of working in the greenhouse industry!) In previous years I have bought frost cloth and plastic from the company Ground Cover Industries, Johnny’s Seeds, a local farmer, or your local AG supply store.
Tar coated string or wire (Home Depot, hardware store, or Amazon).
Durable, weatherproof rope (not twine). We use spools of paracord from Amazon: Amazon.com : Paracord Planet Paracord (50+ Colors) - 1,000 Foot spools - 250 Foot spools - 100 feet Hank : Sports & Outdoors
STEPS:
STEP 1: Cut your Rebar into 2-foot sections.
STEP 2: Place your rebar into the ground on either side of your flower bed. We space the rebar about 6 feet apart on our flower beds. Hammer down your rebar until its about a foot into the ground and a foot above ground.
STEP 3: If you have straight pieces of EMT conduit you want to cut these into 9-foot sections. Once they are cut you want to bend them using your hoop bender. If you are in an agricultural area, you may be able to score some pre-bent hoops from a farmer! We use the Johnnys hoop bender that has great tutorials. Our hoops are about 4’ wide and about 3.5’-4’ tall. Don't worry, you'll mess up the first hoop... It gets easier with practice!
STEP 4: Place your pre-bent hoops onto each piece of rebar along your low tunnel.
STEP 5: Place a 2-foot cut piece of rebar at the end of each flower bed in the ground at an angle facing away from your tunnel. This is how we fasten the end of the tunnel to the ground.

Put your piece of rebar at the end of each tunnel on an angle. When you loop your paracord around the top of each hoop, you fasten it to this piece of rebar giving your whole tunnel structure and stability.
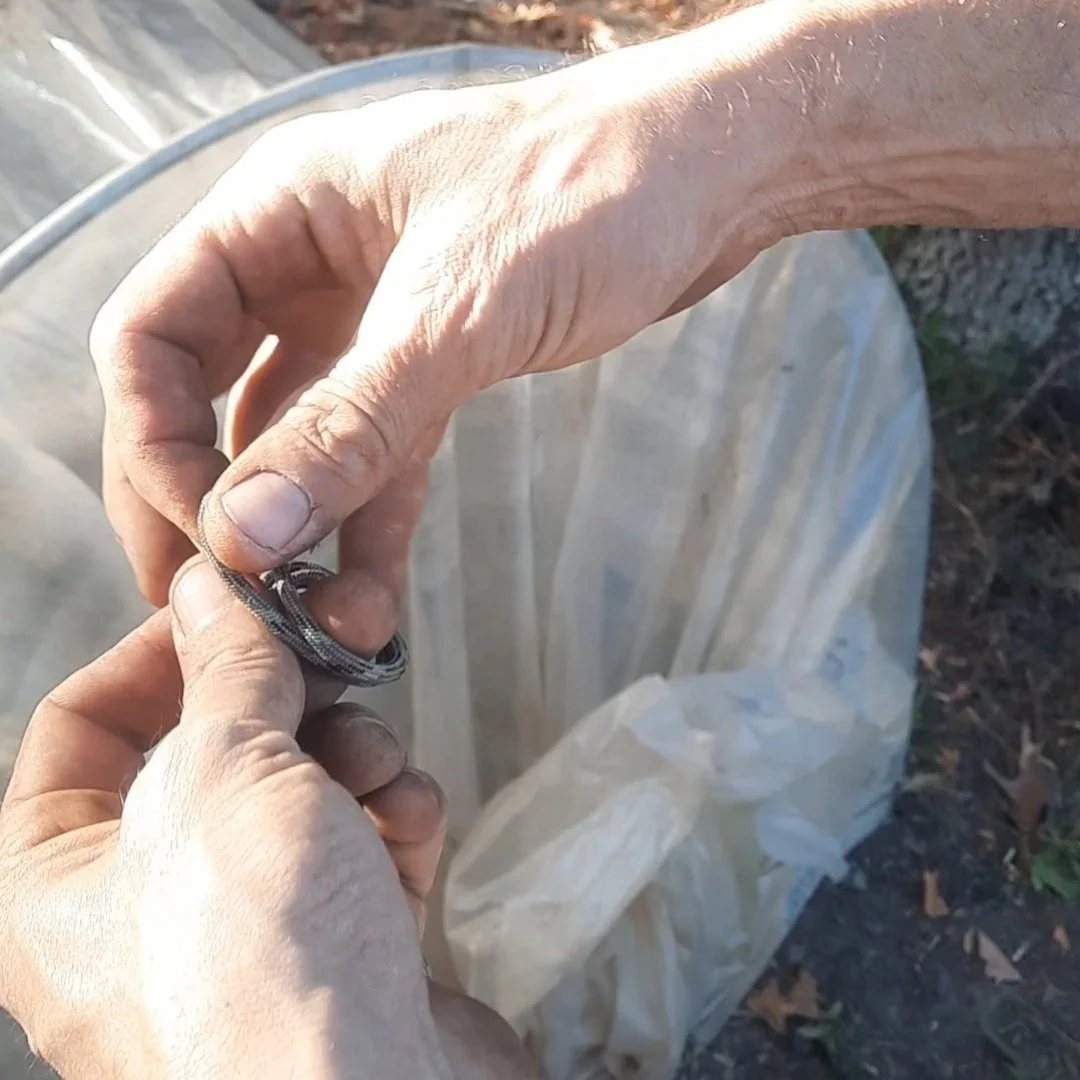
STEP 6: Using your paracord, fasten it to the piece of rebar at the end of your tunnel and then loop it tight around each hoop. Go down the whole tunnel. You are essentially looping each hoop together with the paracord. When you are done, you should have one piece of paracord running down the top ridge of your tunnel.


STEP 7: Cut pieces of wire and twist these around the bottom of each hoop and make a loop to put your paracord through.

Here is the paracord going through the wire loops that are put on each end of our hoops. This is how we keep the plastic on the tunnel.
STEP 8: Time to put the plastic up and fasten it on with your paracord! You are going to make a loop on one end of your paracord and put it through the wire loop on one side of your tunnel, then over top and through the other wire loop. Once this paracord is through both wire loops, meet both ends on the top of your tunnel. Make a simple loop knot and sinch the paracord tight.


STEP 9: At the end of your tunnel, you are going to bunch up your plastic (do not twist it). Once the end piece of plastic is bunched together, fasten it tight with string. We do an additional step of using a scrap piece of EMT Conduit to fold the bunched plastic over and tie tight. We only do this additional step to simply save space at the end of our tunnel, rather than having the bunch of plastic laying there. The final step is to put your piece of paracord through the wire loops on either side of your tunnel and fasten tight. This is the same process that you did along each hoop. There may be some open space at the end of your tunnel near the ground. This is ok! Plants are tougher than you think and can handle this little opening. You may notice some slight frost damage to the plants at the very end of your row.


Key Notes:
Make sure you are using wire or tar coated string to fasten your paracord to each hoop. This connection point is essentially what keeps your plastic tight on your tunnels despite high winds. My first year I used twine, and one strong windy day all the twine snapped, and my plastic was blown off. What a mess!
Make sure you are using tough string to go over the plastic on each hoop. We use paracord. You don’t want any string to snap! Stronger string also allows you to scrunch up your plastic to vent your tunnels.
Use rebar in the ground, and nothing else! When we first learned about low tunnels, we were told to use fiberglass rods to put the hoops onto. Biggest mistake ever! Not only did I waste money on the rods, but everyone snapped in a storm and my plastic flew off!
At the end of each tunnel do not twist the plastic, just bunch it together and tie. By twisting the end of the plastic, you are actually lifting up one side of the plastic tunnel while twisting. It’s better to just scrunch all the plastic together, rather than twist. (Think of it as bunching your hair into a ponytail rather than twisting it into a bun!)
Venting is so important! Since these are small tunnels, they can get hot very quickly. On a sunny winter day, it may be low 40s outside, but high 70s in your tunnels! Most cool flowers prefer low temperatures. Slightly scrunch up the plastic during the day to ventilate.


Flowers I Overwinter Using my Low Tunnels:
Ranunculus
Anemones
Delphinium
Snapdragons
Campanula
direct sown crops like Larkspur, Nigella, Bupleurum and Bachelor Buttons
Foxglove
Agrostemma
Stock
Orlaya
Pansy/Violas
Poppies
Daucus (ornamental carrot)
Some of these crops are so cold tolerant they can survive even without any covering, or just simple frost cloth!


Below are some photos of what our low tunnels look like today. As you can see our property is mostly wooded, so we changed from 100’ long rows to smaller 40’ rows. The tunnels have withstood 50MPH winds, heavy rain, and snow! We are set to have an abundance of flowers for Mother’s Day this Spring. I hope this tutorial can help you have an abundance of blooms as well!


